External Hull Plating
(scroll down to view entire page)
The Iowa-class hull is a wonderfully-complex design, meeting a mountain of requirements. When you consider this work was begun in the 1930s, you (hopefully) begin to
appreciate the amazing feats these engineers, scientists, and tradesmen accomplished. Consistent with traditional ship design, the hull incorporates a frame structure
with shell plating. The plate connection scheme utilized both butt and lap joints. These joints may be clearly seen in photos of the ships - even when taken from a
substantial distance.
The Scale Shipyard hull as delivered is completely smooth-sided and devoid of any surface detail. This should not be considered a shortcoming of this product: rather,
by leaving this detail off of the basic hull, the modeler is given the choice of adding it or leaving it as-is per individual preference.
Early-on in this project I decided to add as much detail as practical, and hull plating was certainly on that list. After discussion at length with Brad Newland,
I decided on the masking-tape-and-filler ("bondo") method of adding the plating detail. The first step - as always - is to devise a plan.
The plating on these hulls is "interesting." As mentioned it uses both butt and lap joints. Additionally, the lap joints are both over- and underlapped (when viewed
from a single perspective). After much searching I was unable to locate yard drawings showing the location of each plate, so resorted to studying/measuring all available
photos. I translated these measurements to profile views of the hull, and used this as my guide.
The chosen method involves creating a lap joint by laying a strip of masking tape along the line of the joint, then carefully applying bondo at this line and feathering it
into the hull, thereby creating the needed triangular profile. It is very easy to "overdo" hull plating, even at this large scale. Since the masking tape I used is
approximately 0.004" thick, getting the bondo layer to exactly the height of the tape would mean a scale 3/8" lap joint. In other words, to obtain the subtle effect I was
after, it would be necessary to carefully control the bondo thickness to the same as that of the tape.
NOTE: I am *NOT* an expert with bondo/filler. In fact this effort represents my first experience using it in such an application! So if you are considering adding this type
of detail but are hesitant due to a lack of experience, go for it.
The basic workflow I used may be described as:
- Layout the plating scheme directly onto the hull using pencil
- Choose one or two "plates" to add with each mix of filler: the plates should be sufficiently far apart from each other to allow room for masking. Note that
due to the short pot life of filler, do NOT try to create too many plates for one mix.
- Tape the "hard edge" of the plate(s) to be added. Be sure to apply the tape to the correct side of the marked line: this defines whether the joint is under-
or over-lapped.
- Mask the hull on the "soft edge" side of the plate. This mask should be near the line for the next contiguous plate: the idea is to constrain
application of bondo to only the width of a single plate.
- I HIGHLY recommend the use of Evercoat "Rage" filler. It costs more than others, but is absolutely worth
it when it comes to application and sanding/shaping.
- Mix a small amount of filler and apply to the hull. Use a suitable spreader: the goals are to a) keep the overall thickness of the filler to the same thickness
of the masking tape, and b) feather the filler out to the soft edge as uniformly as possible. Don't expect a perfect result at this stage: just get the layer of filler
as close as you can. You'll make it "perfect" later.
- Allow the filler to harden: DO NOT REMOVE THE MASKING TAPE!
- Using a long narrow sanding block, sand/shape the filler until just a very thin film remains at the hard edge, and the rest of the plate feathers evenly into the hull -
remember that the goal is to create a triangular or wedge profile for each lapped plate.
Take your time: the results will be worth it.
- Carefully remove the masking tape, and move to the next plate(s).
- Once all the plates are installed, go over entire hull with glazing putty (again from Evercoat) to fill any pinholes and other imperfections.
As a point of reference, I spent roughly 60-hours on this stage of the project. I did have to re-do several plates, but you will find that as you progress, you will
quickly gain an understanding of how to best apply the filler so as to obtain the desired result while requiring the minimal amount of finish sanding.
A final word: this work was very tedious for me, and I grew VERY tired of looking at the white/grey hull. BUT, I am very pleased with the results, so hang in there.
Use the (vertical) scrollbar at right as needed. Clicking on any thumbnail will take you to a larger version of the photo.
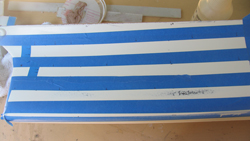 |
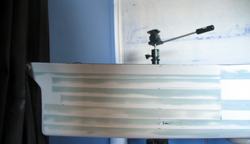
Masking of first run of bow plates.Front view of the mechanism. Note the small arrows at the "hard edge" of each plate. I used
these to help me keep track of the layout (over/underlap) of each plate. |
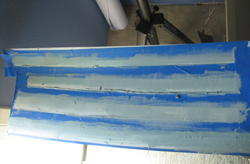 |
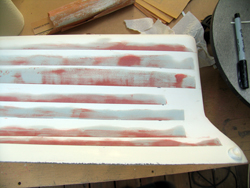
Same area of bow, with coat of filler applied. This was the start of this process... you can see I was not so good at applying an
even coat of filler. Even so, the Evercoat RAGE sands so well, even this amount of over-application was easily resovled. |
| |
|
|
|
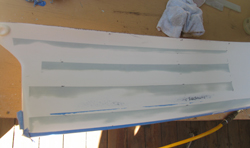 |
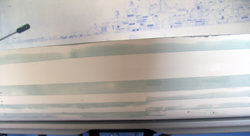
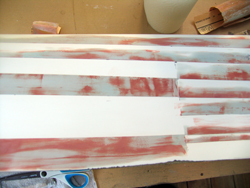
Here's the same area, with the first batch of plates sanded/faired into the hull. You can see that the hull itself isn't purely
flat in some areas: adding the plating will take care of a lot of that too. What we're after is taht sharp edge - in this case at the top of each plate. |
 |
Port side stern, showing all of the added plates. |
| |
|
|
|
 |
Keep working your way along the hull: I completed one side before moving to the other, so I could ensure both would be symmetric.
This is midships section: it provides a good example of the plating scheme on the prototype. Near the bottom, the plates transition from under- to overlapped. |
 |
This view shows the port bow with all plates added and sanded. |
| |
|
|
|
 |
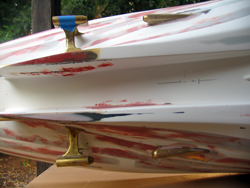
Port side bow plates following application of glazing putty. |
 |
This is the region just aft of the bow plating, again showing the odd arrangement of plates on Missouri's hull. |
| |
|
|
|
 |
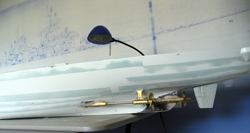
View of bottom of hull in strut area. This is complex region, and I should have added the plating PRIOR to installing the struts.
Live and learn... You can also see the increased taper at the aft end of the skegs, to more faithfully replicate the prototype. |
 |
And finally, an overview of all plates added, looking at the port side. When working with smelly material like plastic filler, I move
everything outside. I'm fortunate to a) live in Southern California and b) have a large deck area with an open roof - perfect for this type of work. Still, at this point
I was fairly burned-out on this view of the model :) |
| |
|
|
|