This section describes the sequence I used to construct my Montana. I
use the term "construct" rather than "assemble" since it better describes the
work required for a kit of this type. Since I prefer full-hull ship models
(as opposed to waterline), I started with the hull, which is provided as top and
bottom halves. The instructions state "Since resin shrinks at
different rates there might be some alignment problems, go for the closest match
possible." After cleaning up the mold lines, (significant) flash and
overspill, I began to study how best to align the halves. I quickly
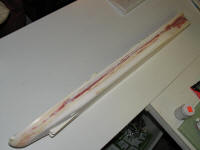
discovered that in fact resin must shrink at vastly different rates, since on my
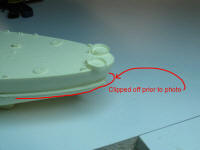
copy the lower hull was about one inch longer than the upper half (see photo).
The thing that struck me as odd was that the forward 7/8s of the hull halves
seemed to line up pretty well with each other: the horizontal profile looked
good up until the very after portion of the fantail: if this resin shrank at
different rates, it seemed to only have done so on the very after end of the
lower half of the hull. So the decision of how to achieve the closest
match possible was easy: line up the bow and let the stern fall where it may.
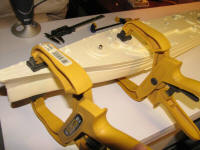
My next chore was to decide how to actually attach the two halves to each other:
these are massive hunks of resin. I could have used epoxy but didn't want
the thickness of the adhesive to affect overall alignment. That left CA,
which of course does not allow for much in the way of repositioning the pieces
once joined. The solution I used was to first clamp the two halves
together in their proper positions, then, using a press, drill four 1/4" holes
down thru the hull at the center point of each barbette. The holes at
turrets 2 and 3 were drilled thru the bottom (to allow for a stand) while at 1
and 4 I stopped at about 1/2" prior to breaking thru. Next I cut four
pieces of 1/4" stainless steel dowel (available at, for example, McMaster-Carr)
such that when installed, each dowel protrudes above the deck by 1/4". The
two dowels at turrets 2 and 3 were cut 2-1/2" longer (again, for the stand).
Once the holes were drilled and the dowels were cut/shaped, by inserting two of
the dowels in the bottom half of the hull, it became a simple task to apply CA
to the mating face of the lower hull then slide the upper hull down over the
dowels, resulting in a perfectly aligned, well-glued joint.
Let me pause for a moment to make a statement about this kit. As stated
elsewhere, this is my first all-resin ship kit, so I really didn't know what to
expect. However, I have seen many assembled resin kits, and I have a good
idea of what the average prices are from the various manufacturers for such
kits: YMW's price for this kit is at the high end of that range (in fact you'd
be hard pressed to find a more expensive kit). So, based solely on price,
my expectations were similarly high. Economies of scale (ie., very low
sales volume) didn't factor into my assessment, since it is my (possibly
incorrect) assumption that ALL aftermarket resin kits are essentially very low
volume. Throughout this write-up I will make subjective statements about
the fit/finish of this kit, and many of them are based on this concept.
Others will be more objective in nature, and in such cases I'll provide
photographic "evidence" to support my claims and observations. On to the
hull construction...
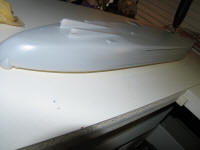
Once the hull halves were joined, I started blending them together. This
required (much) more work than I would have expected for a model of this
caliber. Given the excess length at the stern, the entire aft section had
to be reshaped/blended: I don't mean around the seam - I mean the ENTIRE
after-lower section of the hull. Nevertheless, after a few (five? six?)
hours of filing, sanding, shaping, sanding... I had a seam that looked
presentable. Feeling pretty good about myself, I noticed something that
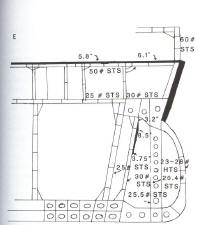
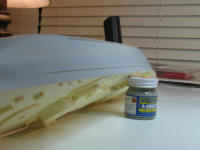
began to nag at me. Literature available on the 'Net indicates that the
final hull design included an armor "blister" not found on Iowa-class ships.
One feature of this blister was a pronounced step at the upper edge of the armor
belt - see the thick black angled line in the image at left (for reference, the
upper horizontal line in this drawing corresponds to the ship's maindeck).
Since the armor was to be 16" thick, it is likely that this step would be at
least that thick. On my kit, the step scaled out to just over 12".
Since this is a significant design feature of this class, I wanted to be sure
the step was prominent. I used some 0.015" sheet stock to beef this
section of the hull up, bringing the scale thickness out to about 17".
More armor is better than less, right?
Click on any image to see larger version: use browser's BACK function to return.

|
|
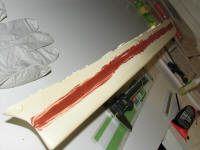
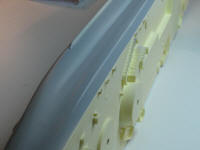
These three photos show the process of attaching the thicker armor belt.
As mentioned, I used strips of 0.015" x 0.25" strip stock glued such that
the upper edge is coincident with the edge of the existing armor band (far left).
With the strips cut and installed, I had to blend them in at the fore, aft,
and lower edges. For this process I used Bondo Glazing and Spot Putty (left).
This material is very fine and so can be forced into the smallest of crevices.
It dries quickly (15 minutes) and if not applied too thick, does not shrink
or crack. Note: don't try to cheat the "too thick" warning - it will bite
you every time. Finally, the glazing putty sands very easily, making it perfect
for this type of work.
|
|
|
Standard putty (eg.,Squadron) needs too much force to shape/sand,
and you wind up sanding away too much resin.
Once satisfied with the first application of filler, I
wet-sanded (600grit) to a smooth finish and primed the entire hull
with Mr. Surfacer White 1000. As always, the first application
of primer does an excellent job of showing up all the problem areas
on what I was sure was a perfect surface. More wet sanding and
a second application of filler (far left) took care of most of these
areas. Once this coat was dry and smoothed, I switched to Mr.
Surfacer Grey 1200 and again coated the entire hull (left).
Note that prior to any of this work, I soaked/scrubbed the hull with Westley's Bleche-White.
|
|
|
|
|
|
Some wet sanding out to 1200-grit and the hull was ready for the final
coat of grey primer. These two photos show the final results of this work. You
can see that the step is now more pronounced without (in my opinion) appearing
over-done: exactly the effect I was after.
At this point I set the hull aside so the paint could dry thoroughly, and to
watch for any cracks which might show up in the filled areas. One final comment
should be made at this stage of the construction: despite the problems I had
mating the two halves of the hull (which won't be a problem for builders of
waterline ships), it is quite apparent that the hull in this kit is really quite
nice. I have not encountered a single bubble or void, and the maindeck details
are really quite nice. More on this later, of course.
|
|
|
|