February 10, 2008 - Aft Superstructure
After completing the center deckhouse, I moved on to the after
superstructure. After adding various details and photoetch parts, the
completed assembly looked as shown in the photo below.

While I was pretty happy with the project overall, the more I looked at the
details, the more disenchanted I became with how certain things looked.
For example, the aft Mk37 director sat too low when compared to the top of
turret #3; the basic structure of the kit-supplied parts was of poor overall
quality, etc. So one evening I sat down with my CAD program and
started tinkering with the idea of a completely scratch-built aft
superstructure (note: the aft stack looks pretty good, so I decided to
incorporate it into the new design). This version would incorporate
the center deckhouse theme into a fully integrated structure, and would
blend seamlessly with the existing forward deckhouse, the result being a
more monolithic superstructure.
Of course, each time I add my own design elements to this model it
lessens the "accuracy," but it's pretty hard to call a model of a ship which
was never built "inaccurate." One of the beauties of building Montana
:).
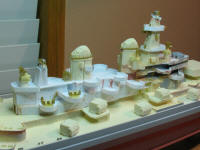
 At any rate, here is the result of this work. This design incorporates a
brutal SIXTEEN quad-40mm gun tubs arranged in a rearward-cascading pattern.
I was after maximum density while retaining a reasonable field of fire for
each emplacement. I also managed to squeeze in four 20mm galleries,
two each forward and aft of the aft stack. Additionally I raised the
after platform one deck, correcting the issue with the after Mk37 director.
At any rate, here is the result of this work. This design incorporates a
brutal SIXTEEN quad-40mm gun tubs arranged in a rearward-cascading pattern.
I was after maximum density while retaining a reasonable field of fire for
each emplacement. I also managed to squeeze in four 20mm galleries,
two each forward and aft of the aft stack. Additionally I raised the
after platform one deck, correcting the issue with the after Mk37 director.
All is happy in Montana... or so I thought. I immediately went to
work printing patterns and cutting plastic...
Since some people have asked, the way I use to cut fairly intricate parts
from sheet stock is as follows:
1. Print the desired pattern and cut it out, leaving a 1/2" (approx.) border
around all cut lines.
2. Tape the pattern to the sheet plastic, being sure to tape all the way
around the perimeter.
3. Cut the part using my dremel 16" variable speed (electronically
controlled) jig saw.
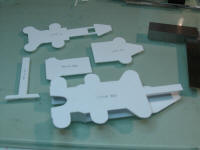
If
you have the saw set up correctly, are using the correct blade, and have a
little experience, you will find that you can obtain very accurate cuts by
hand, even in this scale. Here are the major components used to create
the after superstructure.
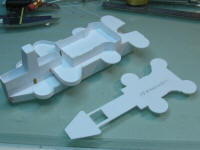
Of course, it is very important to ensure everything is square and plumb
during the construction process, especially in such a small scale, as even
slight errors accumulate into fairly massive scale alignment problems.
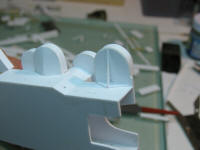
Here's another picture, taken after completion of additional construction.
At this point the 02 and 03 decks are built up, and 04 is in process.
You can see that the new aft fire control tower is integrated into the
deckhouse - no seams to clean up! Also, you will note that on the 03
deck there is a weatherdeck passageway forward of the FCT, allowing crew to
transit between port/starboard gun tubs without having to open hatches, etc.
Note the use of Tom's Modelworks hatches. THEY ARE FABULOUS.
Finally, the curved notch at the front end of the 03 deck is intended to fit
around the forward stack when the fore/aft superstructures are mated
together.
This
photo shows how I handled the cantilevered 40mm gun tubs. A simple
framework was constructed beneath each one, and then this was covered with
.005" sheet styrene, yielding a nice, clean look.
The sequence of images below shows various views of the finished (?) rear
deckhouse mocked-up with the revised forward house.