Hull Correction
This page documents the process of replacing the aft third of the hull with a 3D-printed section.
Use the (vertical) scrollbar at right as needed. Clicking on any thumbnail will take you to a larger version of the photo.
Once I had created a 3D model of the hull section to be replaced, the files were processed in preparation for transmission to the printer.
The parts were completed in four runs: two for the support frames and keel sections, and two for the "skins" which form the outer shell of the hull.
To determine the "graft" location of where to cut the kit's hull, I simply found the area where the two models (drawing-based and kit-based) best-matched.
This turned out to be approximately 18-inches forward of the extreme stern.
I actually printed two correction sets - the first based on 0.020"-thick skins. Although the parts fit together and fit the kit hull very well, it turned
out that the skins were too thin and were not structurally sound-enough to provide a workable surface for smoothing. I cut this first version from the kit hull
and started over, this time basing the design on 0.040"-thick skins. I also reduced the number of internal support frames.
 |
|
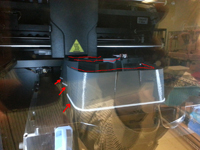
This odd photo shows the original skin design being printed (there is a strong reflection off the front glass door which is confusing). The
actual part being printed is highlighted in red. To print all parts required around 30-hours of printer time. |
|
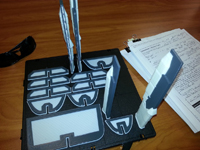 |
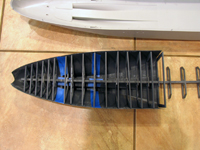
These are the internal support frames and keel sections. The white material is called "support material" - since you can't "print in mid-air"
any overhang must be supported. Once the parts are removed from the printer they are placed in a large ultra-sonic vat containing heated solvent to remove the support
material. |
| |
|
|
|
|
|
 |
|
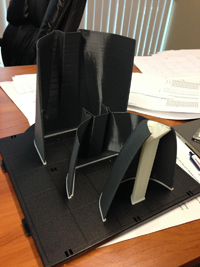
This is the first version of shell pieces. |
|
 |
This view shows the kit hull together with the keel and support frames of the replacement section. The difference between the two shapes is not
readily apparent here. |
| |
|
|
|
|
|
 |
|
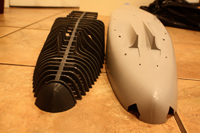
The first version of the replacement parts shown next to the kit hull. The accuracy of the printer became obvious - the parts literally snapped together. |
|
 |
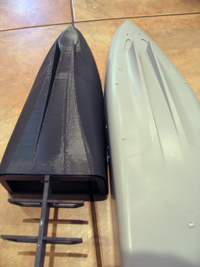
This shows the version 1 framework (whose shape remained unchanged into version 2) in profile with the kit hull. You can easily see the much less massive
profile of each frame, and the more gracefully tansition from the amidships section to the after tunnel. |
| |
|
|
|
|
|
 |
|
Another view - forward looking aft, of the corrected shape compared to the kit hull. |
|
|
|
| |
|
|
|
|
|
 |
|
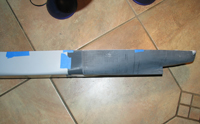
This is the second version mocked up against the hull and maindeck. You can see that I have smoothed out much of the surface irregularity. I had to
create a new transition section due to cutting the first version off the kit hull (doing this consumed another 1/2-inch of the kit hull). |
|
 |
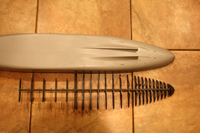
Another view of the version 2 parts. Outwardly identical to the v1 set, the skins are twice as thick. |
| |
|
|
|
|
|
 |
|
This view is a closeup of the surface - AFTER a significant amount of filing and sanding. 3D printing does NOT (in my opinion) create parts which are
suitable for use as-is. They require a good amount of cleanup. There are techniques (eg., acetone vapor bath) which can help clean up small parts, but for the broad flat
surfaces we have here, good old elbow grease is the only real solution. |
|
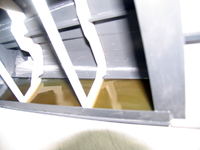 |
Once the version 2 parts were installed on the kit hull, I decided that even though an improvement, I needed still-stiffer sections between the
internal frames. I mixed and poured resin into the largest voids as shown in this image. Once cured, the outer shell was rock-hard. |
| |
|
|
|
|
|
 |
|
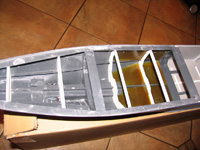
Overall view of the final configuration. At this point the hull is ready for smoothing and final finishing. Another change to the v2 parts was the addition
of molded-in sheer supports for the maindeck. |
|
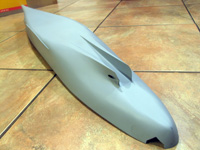 |
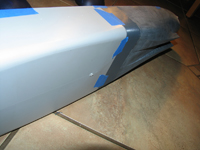
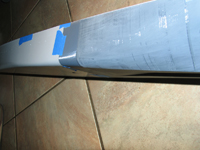
In this photo the hull has been sanded, fared, smoothed, and primed. The portions of the bilge keels lost to the upgrade were rebuilt using styrene. |
| |
|
|
|
|
|
 |
|
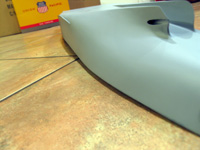
Low-angle view along the side of the hull showing the smoothness I was able to achieve with the hardened sides. |
|
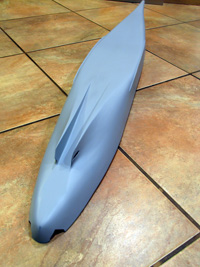 |
Finally, 9-months into the project, the hull is back to where it was when I first opened the box, but with a sexier butt :) |